Thursday, March 7, 2013

Stamped Tile Coasters

 
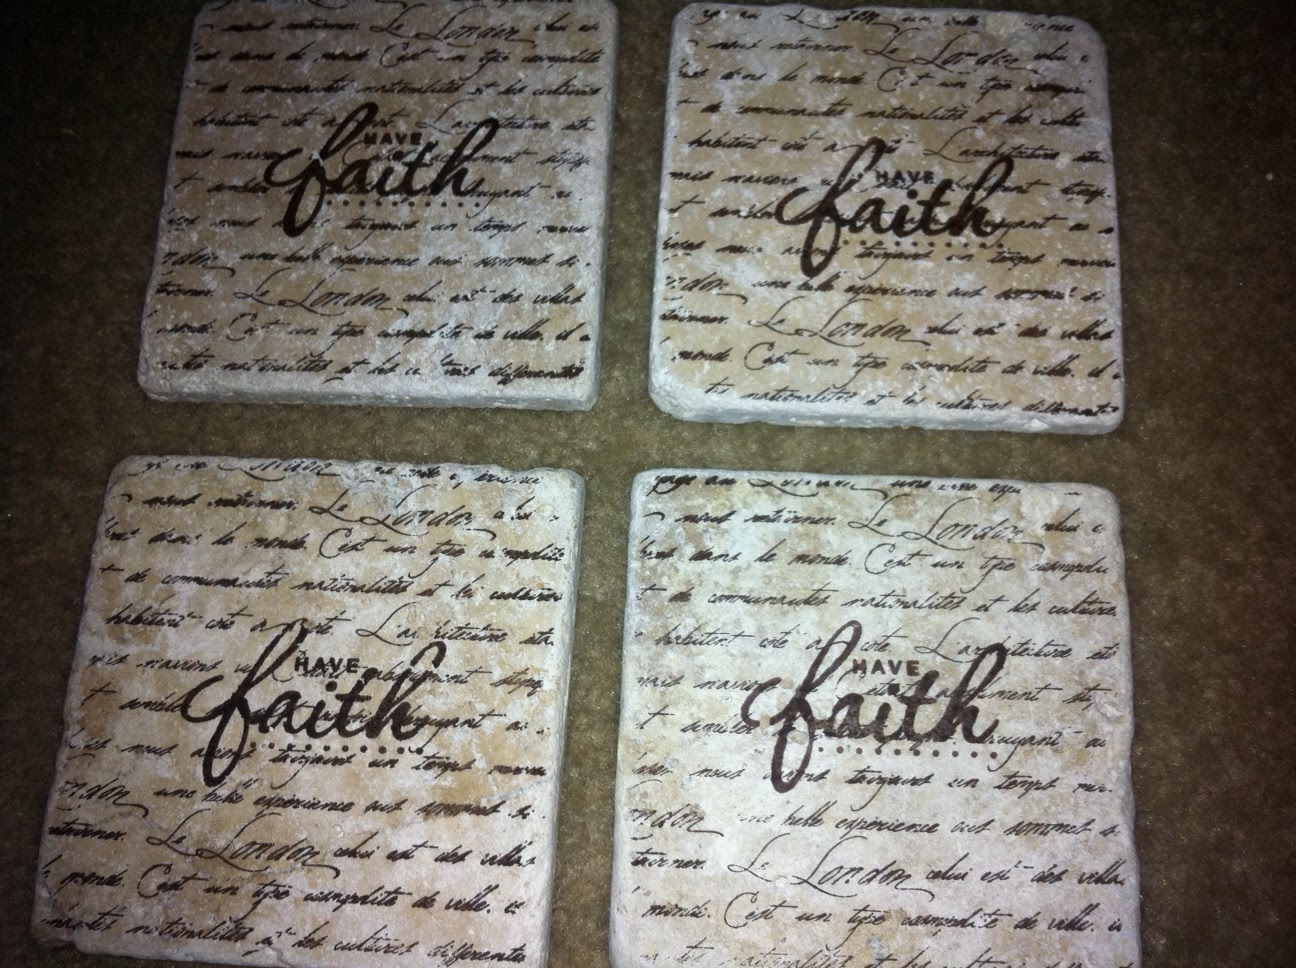
These precious coasters are so fun to make and are a great gift you can personalize for anyone!
  
Materials you will need:
4 - 4"x4" Tumbled Tiles
Staz-on ink pad
Rubber stamps of choice
16 - Felt pads (to avoid scratches)
 

I usually get my tiles from a local tile store that has 48 tiles to a box but if you are just looking to make a couple of sets, any home improvement store will have them in their tile section. Just make sure none of them are broken or have huge holes in them. Once I remove the tiles from the box I use a wet rag to wipe off the excess dust. This will make the ink stick better.
 
  
 I then go ahead and put the felt pads on the bottom of them (one in each corner) so they will not scratch the surface you set them on.
Now it is time to get creative. StazOn inkpads are by far the best ink I have come across and come in a variety of colors. It is permanent so it will not bleed when you set a drink on top of the coaster. I bought mine 40% off at Hobby Lobby. Stamp on your image and let them dry completely.
 
Here are some I have made...


Stack them up and tie together with a bow. Now you have the perfect gift anyone would love to have.


Monday, March 4, 2013

Easter Wreath


I just took an oblong stick wreath and attached a moss garland, bow and birds nest with floral wire. I sprayed the burlap bow with starch so I could make it stand up a bit easier. I bought all of my materials at Ellis Pottery in Longview, Texas but you can find similar items at any craft store. Simple and easy!

Friday, March 1, 2013

Pallet Headboard


We moved into our house last May and wanted to do make a headboard in our spare bedroom that was inexpensive and would be a focal point of the room. I had some extra pallets at work that I brought home and we made this super cute pallet headboard. See how we did it...

Materials needed:
4x8 foot sheet of plywood
2 - 6ft 2x4 (you will need 3 if you are doing a King)
Wood screws (100 - 3/4")
Wood screws (10 - 1")
1 1/2"x3/8" bolt
3/8" nut
Stain/Paint of choice
Polyurethane (optional)
2-3 pallets (depending on bed size)
Drill
3/8" Drill bit
Large foam paintbrush
Miter saw
Circular saw
Saw horses
Sawzall


To find out the size the plywood should be, measure the width of the mattress. Next we figured out the height we wanted the headboard to be then measured the height of the distance of the floor to the top of the mattress and subtracted it from the total height we wanted the headboard. You will mark off the plywood and cut with the circular saw.

You will then cut the 2x4's down to the height you want the headboard. You will then screw (using 1" wood screws) them to the backside of the plywood as pictured above. Make sure they attach all the way to the top of the plywood. If you are making a king size, you will need an additional one in the middle for support.


Now it is time to stain/paint the front and sides of the plywood and 2x4's.

While it is drying, you can use this time to remove the boards from the pallet. We just took a sawzall  and cut through the nails between the boards and the pallet. I cannot tell you how much time this saved.

Once you have all of the boards removed and the base has dried, you are ready to set out the boards where you want them. You will then cut off the overlap on the sides so it fits the width of the plywood. We attached each row one at a time so we didn't get any rows out of order or mixed up. You will attach each board with the smaller 3/4" wood screws from UNDERNEATH. This will ensure you don't see the top of the screws and it will look much cleaner. Make sure you attach each board in several areas so it does not fall off.


We let the top row overhang over the plywood so it would look more shabby.
This is where you will apply polyurethane to the pallet boards if you prefer. It will look shiny like the second picture below.


Now you are ready to attach to the frame of the bed. You will just set it in place behind the mattress and mark on the legs where the holes are on the frame. You will then take the bed back to your work area and make a 3/8" hole where the marks are. Attach the headboard to the frame with the nut and bolt.

I added a cute saying with a vinyl sticker. Several companies on Etsy can offer any type of sayings in any font or color.
Happy Building!


Wednesday, February 27, 2013

Check out what we made with ceiling medallions! They already come primed so all you do is paint and hang. It makes a great conversation piece and wall art!

We got ours from ArchitecturalDepot.com

Monday, February 25, 2013

Marquee Letter


We are getting married in September so I am trying to knock out some of the projects on our To-Do list. I found some amazing marquee letters on Etsy but were all way out of my price range so I decided to do some research on how to make one (thank you Pinterest) and here is how we did it...

I found the MDF letter on Etsy...http://www.etsy.com/shop/BuildACrossCanton
It's 18" tall and 3/8" thick for $11.99 plus shipping.

The remaining materials you will need:
Pencil
Room Essentials clear globe string lights from Target - $11.99
Paint - I bought a Valspar sample at Lowe's - $3.00
Paint Brush - preferrably foam
Primer - Kilz original in the spray can
Drop Cloth
Drill
Drill bit (1/4")
Paddle Drill Bit (1/2" and 3/4")
Zip Ties

Prep your work area with a drop cloth.

Measure out where your bulbs will go and make a dot that is about 1/4" big with a pencil. I would try and use all 25 lights if possible but if it doesnt measure out that way, you can just take the bulbs out that are left over and hide the cord within the rest of the strand.

With the letter facing up, drill a regular 1/4" hole all the way through the marked dots you made. This will help you on the next step.

Flip over the letter (backwards). You will need the drilll and 3/4" paddle drill bit to drill HALFWAY through the backside. This will allow the bulb to screw to the socket. The hole you drilled from the otherside will tell you where to drill.

Once you are done with that, flip the letter back over. You will take the drill and 1/2" paddle drill bit and drill all the way through the first hole you made.

Now you are ready to make sure the lights fit. There is a foot between each set of lights so you should be able to start on one side and make it to the to the other with no problem.

You are ready to paint. Always spray a primer before painting. We use Kilz original in the spray can.

Once the primer dries, you are ready to paint. We used our air compressor and spray gun but painting it by hand is definitely fine. I would recommend at least two coats.

Now the fun part, putting in the lights and turning them ON! Once you screw in all of the lights, use small zip ties to contain all of the excess part of the strand. This will neatly hide all of the wire behind the letter.

You now have your own handmade marquee letter!


I created a blog...what was I thinking?

Howdy! My name is Kimberly and I have finally decided to create a DIY blog for all of our handmade crafts and projects. This way I can give detailed tutorials on how we make them so you can do them yourself at home.

I don't know if this is going to make me want to pull my hair out or become an addiction but here goes nothing...