Monday, March 25, 2013

LOVE Vase

 
Over the weekend, a dear friend of mine asked me how I made this cute love vase, which inspired me for my post today. All I did was take a half gallon beer jug and wrote "love" with hot glue and then spray painted the whole jug. You can use a carafe, mason jar, wine bottle....you name it!

I got my inspiration from Pinterest, the greatest website in the world!

Wednesday, March 20, 2013

Monogrammed Wall Art

Good morning my Shackers!! Our dear friends Stephanie and Jeremy are getting married next month and asked us to help them with a wall art piece to display at their reception. Here is how we did it...

 
Materials needed:
The MDF letter is from Etsy...http://www.etsy.com/shop/BuildACrossCanton
It's 24" tall and 3/8" thick for $11.99 plus shipping.
We used 8 boards from a pallet but 1x4's or old fence will work fine
Paint of choice
Drill
3/4" wood screws
2-1x3 boards (cut 2" smaller than the width of your 8 boards)
Wood glue
Nail gun with 3/4" nails (you can use screws if you do not have access to a nail gun)
 
Use the MDF letter as your guide to measure the size of the boards. This particular letter fit across 8 boards with about 3" left on either side. We cut the length of the boards to also be about 3" on the top and bottom of the letter.
 
 
Flip the boards over to where the side you are going to paint is face down. You will put your 1x3's acorss the boards about 1/4 of the way down. Drill a screw in each board so they are all attached to the 1x3's (pictured above).
 

Here is what it will look like once flipped back over.
 
 
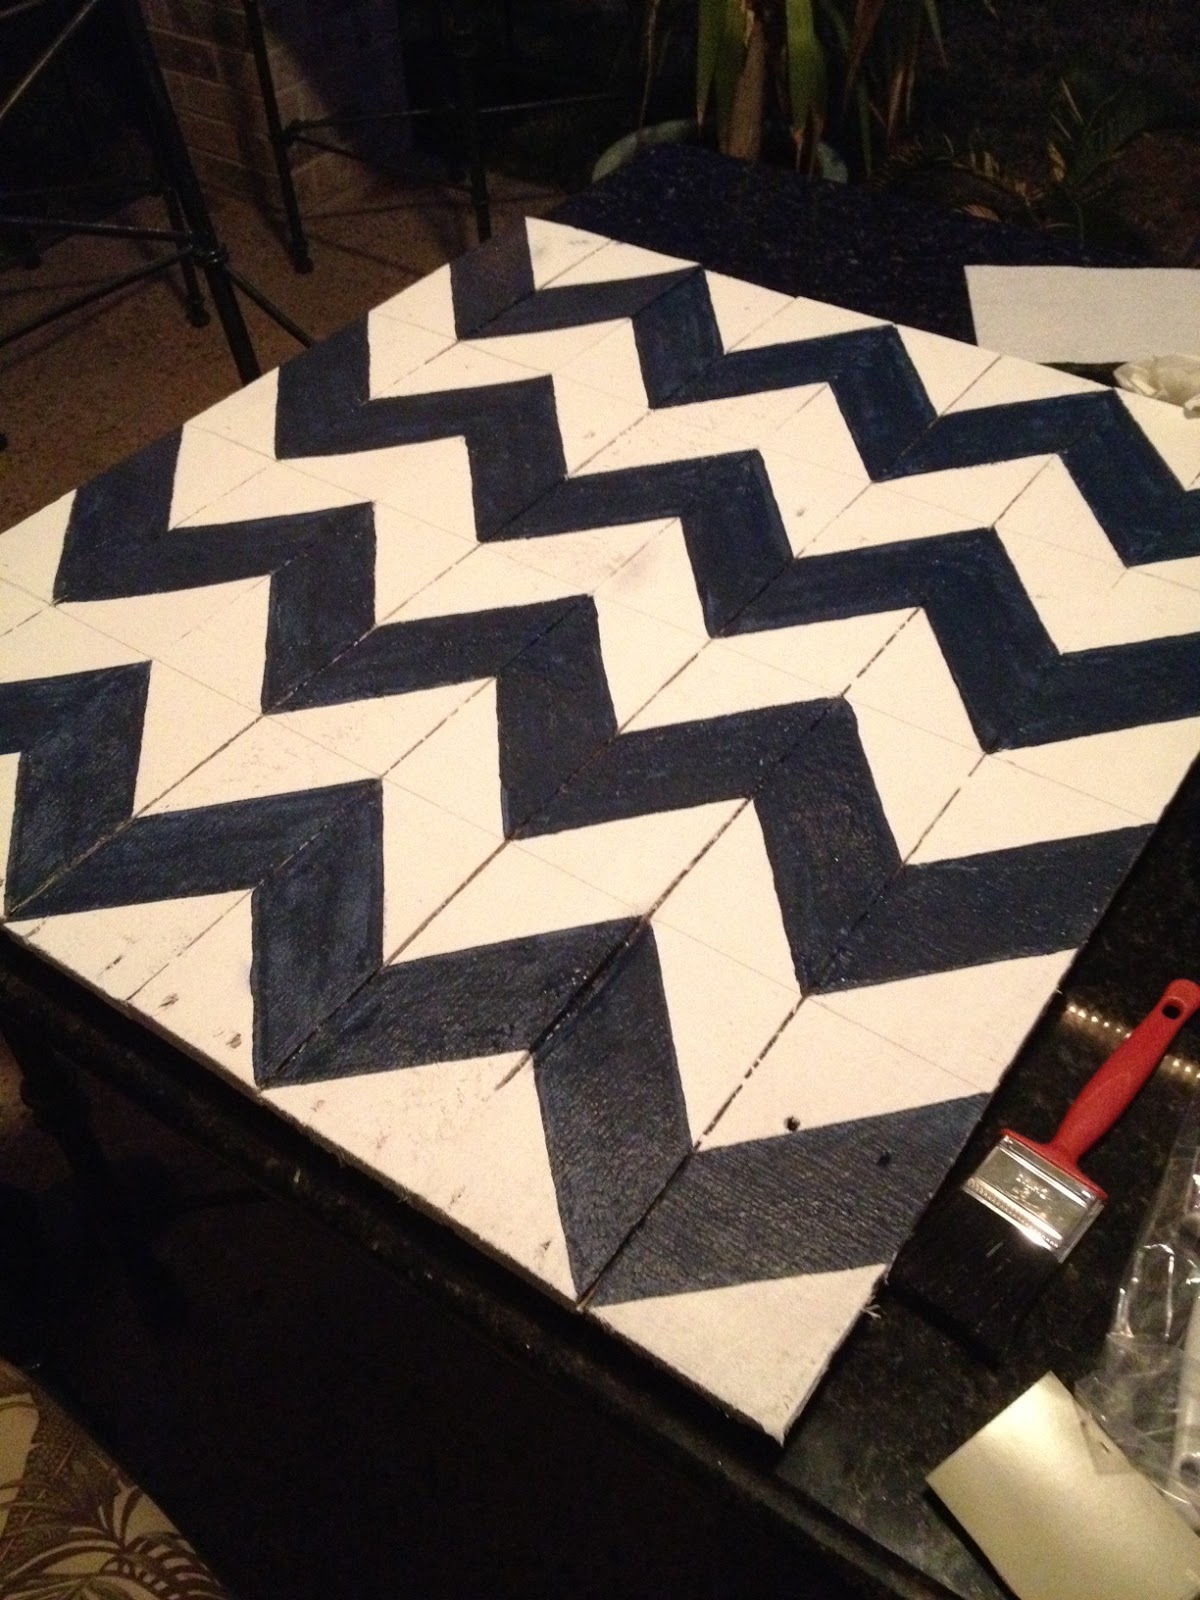
You can do any design on the background or letter but we decided to do a chevron background with a solid color letter. First we painted the whole board white. As you can see we sped up the process by blow drying it with a hair dryer (works like a charm, by the way).


She knew she wanted 4 sets of shevron stripes so we divided the board horizonally by 8 and used the lines of the 8 individual boards for our vertical line. We then drew out the chevron stripes like the picture above.
 

Now you are ready to paint! We were going to tape off the lines but knew that would take forever so we took the chance on hand painting it. We marked the sections where the blue paint will go to keep us from painting the wrong section.
 

The good thing is if you go out of the lines, you can go back and paint over it with the background color.
 

The letter is now ready to be painted. We used a spray gun but spray paint or brushing on the paint is totally fine.
 

Once the letter is dry, mark off where you want it on the board (we marked it off with painters tape). Take the letter off and put wood glue on the back. Use the painters tape to put the letter back on the board. Let it sit for 5 minutes.
 
Lift the board on it's side and use your nail gun to nail the board to the letter from the backside.
 
Hope you love it!


Friday, March 15, 2013

Earring Holder


Jeff made me this earring holder to organize the mounds of earrings that were tucked away in a bathroom drawer.
 
Materials needed:
Barnwood frame (any frame will work)
Aluminum Metal Sheet 4'x8' sheet at Lowe's used for concrete (chicken wire will work)
Wire clippers
Paint color of choice (optional)
Clear caulking or staples
 
Put the frame face down and measure the height and width of the inside (where the glass would go).
 
Next, paint the frame unless you want it as it is.
 
While the paint is drying, use the wire clippers to cut down the metal to fit the inside of the frame.
 
Once the paint is dry, put the frame face down.
 
Put the clear caulking on the inside of the frame (where the glass goes) and set the metal into place. Once the metal is in place add another layer on top of the metal all the way around the inside. You will then need to find something heavy to set on each corner of the metal and let the caulking dry.
 
If you prefer to use staples, you will just use a staple gun to staple the metal to the frame (a few inches appart all the way around).
 
I would recommend letting it dry overnight.
 
Now you have a cute but efficient earring holder.
 

Tuesday, March 12, 2013


How cute is this Egg Tree?

I used twigs and hanging eggs (from Dollar Tree) to make this super easy tree for Easter.


Thursday, March 7, 2013

Stamped Tile Coasters

 
These precious coasters are so fun to make and are a great gift you can personalize for anyone!
  
Materials you will need:
4 - 4"x4" Tumbled Tiles
Staz-on ink pad
Rubber stamps of choice
16 - Felt pads (to avoid scratches)
 

I usually get my tiles from a local tile store that has 48 tiles to a box but if you are just looking to make a couple of sets, any home improvement store will have them in their tile section. Just make sure none of them are broken or have huge holes in them. Once I remove the tiles from the box I use a wet rag to wipe off the excess dust. This will make the ink stick better.
 
  
 I then go ahead and put the felt pads on the bottom of them (one in each corner) so they will not scratch the surface you set them on.
Now it is time to get creative. StazOn inkpads are by far the best ink I have come across and come in a variety of colors. It is permanent so it will not bleed when you set a drink on top of the coaster. I bought mine 40% off at Hobby Lobby. Stamp on your image and let them dry completely.
 
Here are some I have made...


Stack them up and tie together with a bow. Now you have the perfect gift anyone would love to have.


Monday, March 4, 2013

Easter Wreath


I just took an oblong stick wreath and attached a moss garland, bow and birds nest with floral wire. I sprayed the burlap bow with starch so I could make it stand up a bit easier. I bought all of my materials at Ellis Pottery in Longview, Texas but you can find similar items at any craft store. Simple and easy!

Friday, March 1, 2013

Pallet Headboard


We moved into our house last May and wanted to do make a headboard in our spare bedroom that was inexpensive and would be a focal point of the room. I had some extra pallets at work that I brought home and we made this super cute pallet headboard. See how we did it...

Materials needed:
4x8 foot sheet of plywood
2 - 6ft 2x4 (you will need 3 if you are doing a King)
Wood screws (100 - 3/4")
Wood screws (10 - 1")
1 1/2"x3/8" bolt
3/8" nut
Stain/Paint of choice
Polyurethane (optional)
2-3 pallets (depending on bed size)
Drill
3/8" Drill bit
Large foam paintbrush
Miter saw
Circular saw
Saw horses
Sawzall


To find out the size the plywood should be, measure the width of the mattress. Next we figured out the height we wanted the headboard to be then measured the height of the distance of the floor to the top of the mattress and subtracted it from the total height we wanted the headboard. You will mark off the plywood and cut with the circular saw.

You will then cut the 2x4's down to the height you want the headboard. You will then screw (using 1" wood screws) them to the backside of the plywood as pictured above. Make sure they attach all the way to the top of the plywood. If you are making a king size, you will need an additional one in the middle for support.


Now it is time to stain/paint the front and sides of the plywood and 2x4's.

While it is drying, you can use this time to remove the boards from the pallet. We just took a sawzall  and cut through the nails between the boards and the pallet. I cannot tell you how much time this saved.

Once you have all of the boards removed and the base has dried, you are ready to set out the boards where you want them. You will then cut off the overlap on the sides so it fits the width of the plywood. We attached each row one at a time so we didn't get any rows out of order or mixed up. You will attach each board with the smaller 3/4" wood screws from UNDERNEATH. This will ensure you don't see the top of the screws and it will look much cleaner. Make sure you attach each board in several areas so it does not fall off.


We let the top row overhang over the plywood so it would look more shabby.
This is where you will apply polyurethane to the pallet boards if you prefer. It will look shiny like the second picture below.


Now you are ready to attach to the frame of the bed. You will just set it in place behind the mattress and mark on the legs where the holes are on the frame. You will then take the bed back to your work area and make a 3/8" hole where the marks are. Attach the headboard to the frame with the nut and bolt.

I added a cute saying with a vinyl sticker. Several companies on Etsy can offer any type of sayings in any font or color.
Happy Building!